Generator Sizing Calculator Excel Build Guide
Learn how to build and use a generator sizing calculator Excel sheet with formulas, inputs, derating and a downloadable template walkthrough.

You're probably staring at a spreadsheet right now with a rough load list in one column and a question in your head: is this enough to size the generator, or am I about to quote the wrong unit?
That's where most generator sizing calculator Excel files go sideways. People total up appliances, toss in a little padding, and call it done. On paper it looks organized. In the field it can miss the one thing that drives the decision, the largest motor starting event, plus the derating that eats away at capacity when the site is hot.
A usable spreadsheet has to behave more like a load worksheet than a shopping list. It needs to separate what runs steadily from what cycles, capture which loads overlap, identify the single controlling surge, and then convert that into a generator size you can defend to a customer, a permit reviewer, or your own install crew.
Table of Contents
- Why Most Excel Sizing Sheets Get It Wrong
- What Your Generator Sizing Calculator Needs Before Formulas
- Core Formulas That Power a Reliable Sizing Calculator
- Building Your Excel Template Step by Step
- Validating Results and Accounting for Real World Conditions
- Final Checks and Next Steps for Your Quote
Why Most Excel Sizing Sheets Get It Wrong
The bad quote usually starts in a kitchen or mechanical room with a shortcut.
A homeowner says the house is about 2,000 sq ft, wants most of the house backed up, and points to the panel as if that settles the load. Someone opens an old workbook, picks a size from a square-foot table, adds a little cushion, and gets a clean-looking answer. Then the actual loads show up. A 3-ton condenser with a stiff starting hit and a well pump on the same project can swing the recommendation by several kilowatts, even before site derating enters the picture. One published example shows a 2,000 sq ft house with gas heat and a 3-ton AC landing around 14 to 18 kW depending on how AC starting is handled (Pro Tech Power Northwest guide).
That is the failure point. Square footage can help with a first pass, but it cannot tell you which motor controls the start event, which loads recover together after an outage, or how much rated output disappears once the generator is installed in heat.
The spreadsheet mistake I see most often
The sheet either stacks every load and every surge on top of each other, or it ignores startup current and sizes from running watts alone. I see both versions in customer-supplied calculators and old estimating templates. Both are wrong for the same reason. They do not model how the generator will be asked to start and carry the house.
A usable sizing sheet separates steady load from starting load and treats the single largest motor start as the controlling event unless the installation has a real reason to expect overlapping starts. That is how many practical calculators are structured: total the running watts, add one governing startup adder, apply a planning buffer, then round to the next available generator size (Generator Budget calculator framework).
Practical rule: If the Excel file adds every motor surge, it usually oversizes the unit. If it adds none, it usually undersizes it. The job is to identify the one start event that actually governs selection.
Why installers need a better worksheet
The spreadsheet has to survive more than the sales call.
It often ends up in the quote file, the permit backup, or the handoff to the install crew choosing the transfer switch, breaker positions, and any load-shed logic. That is why I build these sheets around a field-ready structure, not a generic appliance checklist. The model needs to show which circuits are backed up, which motor creates the highest start requirement, which loads are allowed to overlap, and what derating factors cut into available capacity on site.
Those details are what keep a 14 kW quote from turning into an 18 kW correction after the survey, or a nuisance-trip problem after startup. If the workbook cannot identify the controlling motor and reduce nameplate output for real conditions, it is organized, but it is not reliable.
What Your Generator Sizing Calculator Needs Before Formulas
A sizing sheet usually goes off track before a single formula is entered.
The failure point is the input table. If one row hides three different motor loads, if optional loads sit beside must-run loads with no flag, or if no one records how equipment starts after an outage, the math will still calculate cleanly and the recommendation will still be wrong. I have rebuilt plenty of quote spreadsheets where the formulas were fine but the structure guaranteed a bad answer.
Start by setting up the workbook like a field worksheet, not a generic appliance list. The goal is to capture the one motor start that can govern generator selection, while keeping every other load organized well enough to test overlap, sequencing, and derating later.
The cleanest layout uses three input blocks: base running loads, motor or compressor loads with starting data, and priority or managed loads. That split matters because these groups behave differently in the system. Lighting and controls usually contribute steady demand. Motors create the spike that often drives generator choice. Managed loads may be allowed on the sheet for the customer conversation, but they should not inflate the base recommendation.
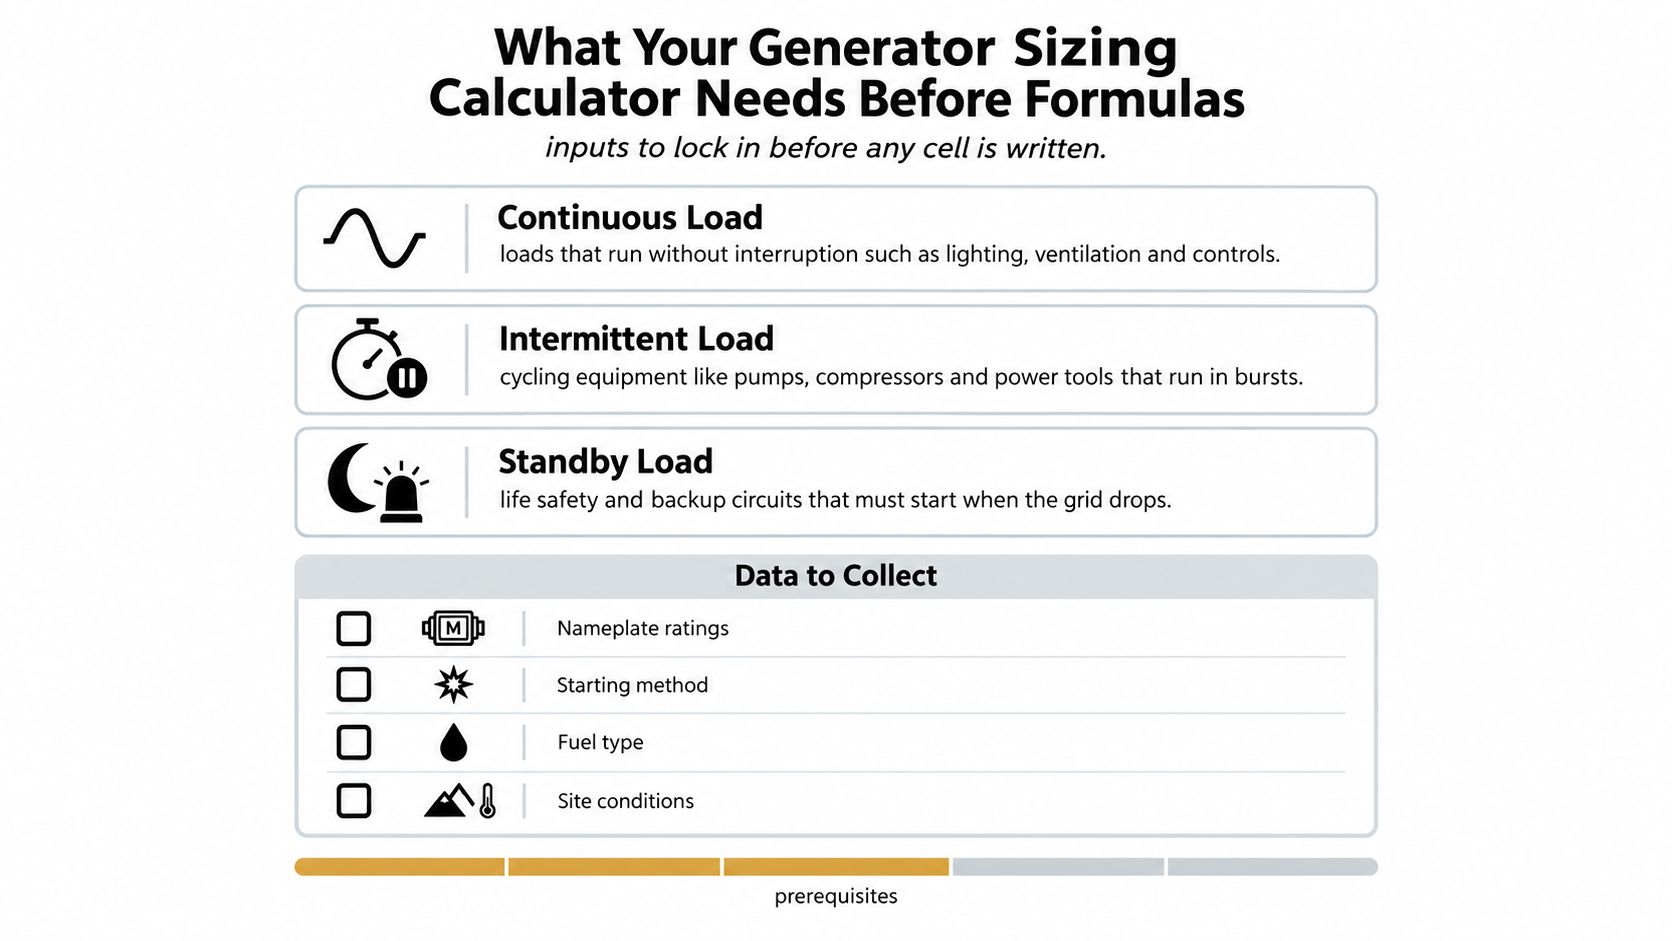
The three input blocks that matter
I'd build the worksheet so each block answers a different jobsite question.
- Base running loads. Lighting, controls, receptacle loads that are expected to stay active, refrigerators, freezers, fans, and electronics that make up the steady demand.
- Motor and compressor loads. Well pumps, sump pumps, sewage ejectors, condensers, air handlers, compressors, shop equipment, and any load where starting behavior can change the selected generator size.
- Priority and managed loads. Circuits marked must-run, can-delay, can-shed, seasonal, or future. These tags matter later when you test realistic operating scenarios.
That layout makes review faster. It also gives you a clean place to isolate the controlling motor instead of hunting through mixed rows later.
What each row should capture
Each row should describe one load clearly enough that another estimator or installer can audit it without calling the salesperson back.
For a non-motor load, capture:
- Load name or circuit description
- Running watts or amps and voltage
- Phase, if applicable
- Priority status
- Seasonal or optional flag
- Notes
For a motor-driven load, add more detail:
- Running watts or full-load amps
- Locked-rotor amps, starting watts, or startup multiplier
- Horsepower
- Starting method, such as across-the-line, soft start, or VFD
- Whether it can start while other major loads are already running
- Any control note, such as startup delay or lockout after transfer
That last group is where a lot of homemade spreadsheets fall apart. A 1 HP well pump and a 1 HP air compressor do not necessarily hit the generator the same way. Starting method, wiring length, voltage dip tolerance, and whether the transfer switch restores them together all change the actual demand.
Use separate columns for source of data and confidence level if the project is still in quoting. For example: nameplate, customer-provided, submittal, or estimated. I started doing that after seeing too many sheets treat rough guesses and verified equipment data as if they carried the same weight.
Load timing is not optional
Timing belongs in the input side, not buried in a comment after the estimate is sent.
A field-ready workbook needs columns for simultaneous operation, restart after outage, delay before start, and shed allowed. Without those fields, someone will eventually add every motor surge or ignore all of them. Both mistakes happen all the time in sales sheets.
Here is the practical check: if the outage ends and the transfer switch picks up the house or building, what tries to start in the first minute? That answer usually matters more than a polished total-watts summary. In many installations, one pump or compressor is the governing event. In others, load controls or programmed delays keep that event from happening at the same time as the rest of the demand.
This is also the point where a customer conversation saves rework. A plain-language checklist like these questions to ask a generator installer helps flush out details the spreadsheet needs, such as whether HVAC is delayed, whether the well pump can lock out during recovery, or whether a future EV charger should be excluded from the base size.
One more worksheet tab helps in the field. Add an assumptions log with date, author, and every judgment call that affects sizing. If you later change a pump from estimated startup watts to actual LRA, you want that revision visible. It keeps the quote, submittal, and install handoff aligned.
A quick visual can help before you start building tabs:
Core Formulas That Power a Reliable Sizing Calculator
A sizing sheet fails when it treats every load spike as if it hits at once, then ignores what heat, altitude, and power factor do to the generator you can buy. The math is simple. The judgment is where bad Excel models drift off course.
A field-ready workbook should answer one question first. What is the worst operating moment the generator will see? In many jobs, that is not the total connected load. It is the site running normally while the single largest motor start hits, then adjusted for the generator's real output at that location.
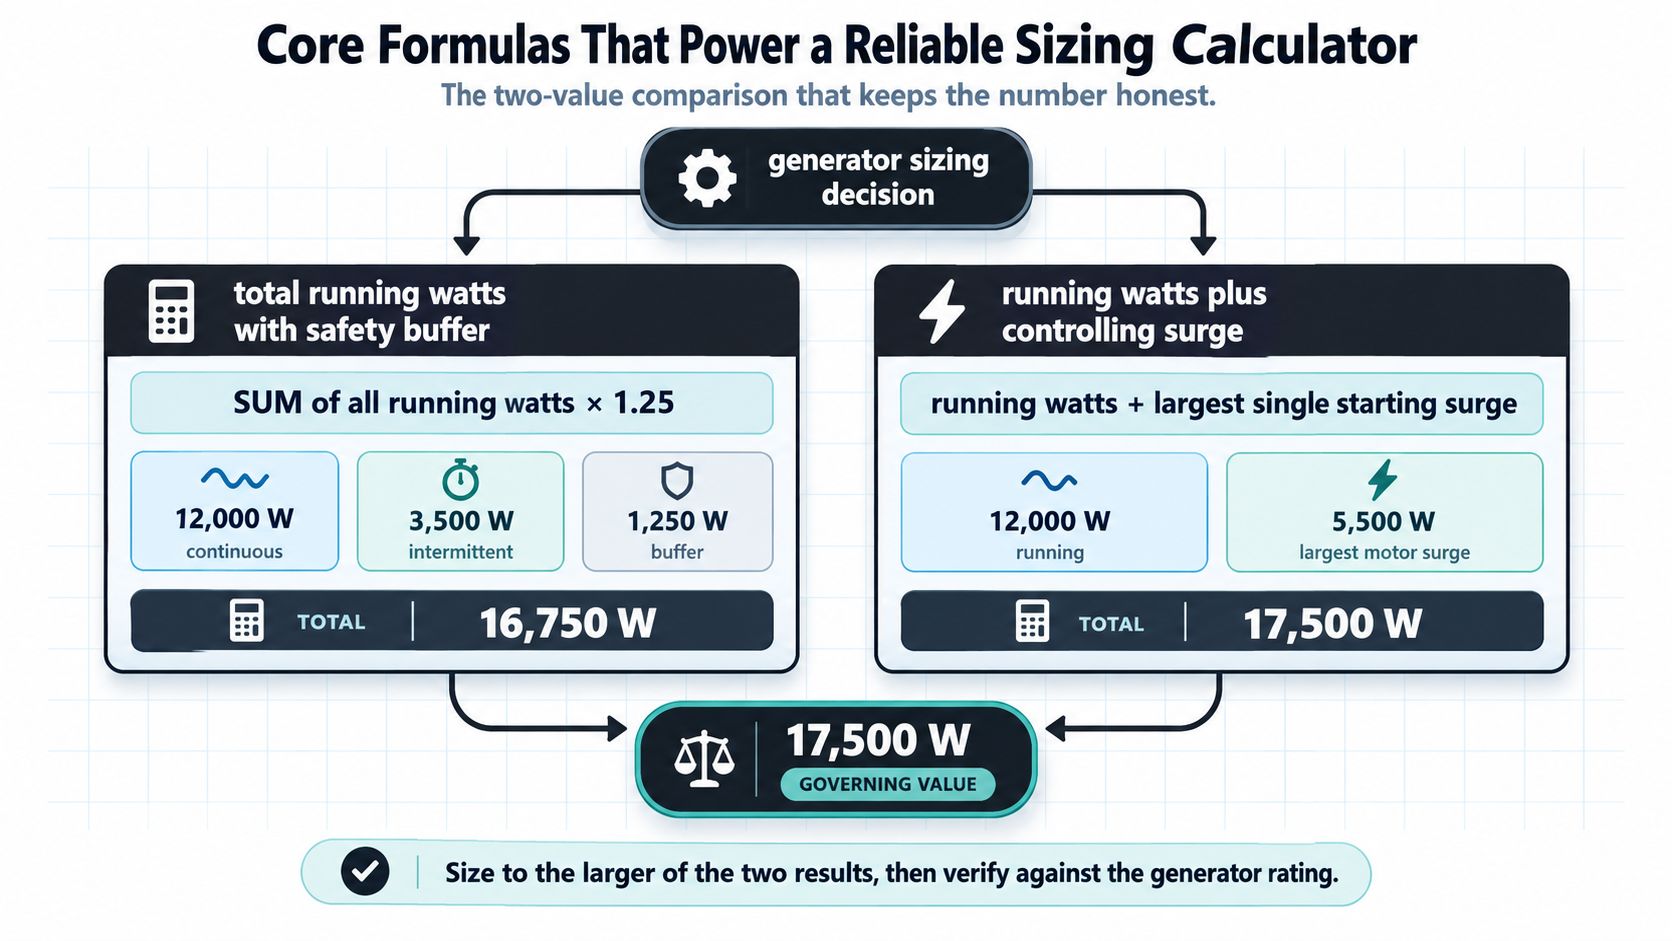
The decision formula
Build the calculation around these worksheet outputs:
- Total running load
- Controlling motor starting demand
- Planning margin
- Site derating factor
- Selected standard generator tier
The governing requirement is the larger of these two values:
- Running load with margin
- Running load during the controlling start event
In Excel, that usually means one decision cell built around MAX(), with the start event modeled as running demand plus one motor inrush, not a stack of every surge on the page.
Add one startup event, not every startup event. The generator only has to survive the controlling transient that occurs, not an impossible pileup you created in a worksheet.
A practical version looks like this:
=MAX(Running_kW*(1+Margin), (Running_kW_At_Start + Start_kW_Adder)) / Derate_Factor
That last division matters. If the unit loses output at elevation or high ambient, the worksheet should size up before you round to a standard model, not after.
Why only one surge gets added
Quote sheets often oversize because someone totals the well pump surge, the condenser surge, the fridge surge, and the air compressor surge as if they all lock rotor at the same instant.
That can happen in a poorly sequenced system. It is not the default assumption.
The better method is to identify the single largest motor or chiller start, then define what other loads are already running when that start occurs. If load shedding, time delays, or soft starters prevent overlap, the worksheet should reflect that. If two large motors can start together, then model that specific event as its own scenario instead of burying the assumption in one inflated surge column.
This is one place I see spreadsheet shortcuts cause expensive mistakes. A padded total may look safe on a sales quote, but it can push the customer into a larger enclosure, larger pad, more fuel use, and a higher transfer switch cost with no operating benefit.
Starting method changes the answer
Starting method belongs in the model, not in a note nobody reads later. Direct-on-line starting, soft start, and VFD control do not hit the generator the same way, so one universal multiplier across all motor rows is a weak shortcut.
Use one of these approaches:
- Direct entry method. Enter running kW and measured or published starting kVA for each motor load.
- Multiplier method. Enter base motor load, select starting type from a dropdown, and let Excel apply the multiplier from your equipment standard.
- Scenario method. For larger projects, calculate separate start cases for each major motor and compare them.
The direct entry method is usually better when you have submittal data. The multiplier method is better early in quoting, when nameplate information is incomplete. What matters is that the workbook makes the assumption visible.
Demand treatment and safety factors
Demand factors and planning margin do different jobs. Mixing them in one cell is how sheets become impossible to audit.
Demand treatment belongs on the load side. Apply it only to loads that will not run at full coincidence, and only when the operating pattern supports it. Planning margin belongs after you have a believable operating requirement. I keep those fields separate so anyone reviewing the file can see whether the size increased because of real load, customer reserve capacity, or site derating.
That separation also helps when the engineer, salesperson, and installer all touch the same workbook. Each person can challenge the right assumption instead of arguing over one opaque final number.
kW versus kVA in the workbook
A watts-only sheet misses generator problems all the time. Motors and compressors can be acceptable in steady kW and still cause trouble on starting kVA.
Track both.
Use separate cells for:
- Running kW
- Running kVA
- Starting kVA for the controlling motor
- Power factor assumption
- Derated generator kW
- Derated generator kVA
Then compare like with like. Check steady operation against generator kW. Check the controlling start event against generator kVA, using the manufacturer's data for motor starting capability if you have it. If your workbook does only one grand total in watts, it will miss the jobs that start fine on paper and sag badly in the field.
Building Your Excel Template Step by Step
The job usually goes sideways at the same point. The load list looks fine, the running total looks reasonable, and then the well pump or condensing unit starts and the generator bogs because the sheet was built around a grand total instead of the one motor that controls the start event.
Build the workbook around that reality first.
A field-ready file usually needs four tabs: Inputs, Load Table, Calculations, and Summary. That layout matches how quotes get built and reviewed. Collect site facts first, enter each real load second, run the math third, and give sales or the customer a clean summary page that does not expose every helper column.
Tab one setup
The Inputs tab should hold only project-wide assumptions. Keep it boring on purpose. If this page gets cluttered, someone will bury a formula in it and the workbook gets harder to trust.
Split it into two blocks:
- Project details: job name, address, voltage, phase, fuel, requested runtime
- Site and design assumptions: elevation, ambient condition, rating basis, reserve allowance, load management yes or no
A few controls save headaches later:
- Use data validation lists for phase, start method, load class, and duty type
- Protect formula cells and leave only input cells editable
- Add a notes field for anything taken from a site call, photo, or customer memory instead of a nameplate
- Mark required inputs clearly so blank motor data does not slide through to the summary
The main load table
The Load Table tab is where weak spreadsheets usually fall apart. One row per actual load. No merged cells. No mixed units. No notes like "pump maybe 2 hp" sitting where a numeric value should be.
I would use more columns than the stripped-down sheets you see online, because those extra fields make the result auditable:
| Load Item | Qty | Voltage | Phase | Run kW | Run kVA | Start kVA | Start Method | Duty | Include | Controlling Motor Candidate | Notes |
|---|---|---|---|---|---|---|---|---|---|---|---|
| Refrigerator | 1 | 120 | 1Ø | Across line | Continuous | Yes | No | ||||
| Well Pump | 1 | 240 | 1Ø | Across line | Intermittent | Yes | Yes | ||||
| Air Conditioner | 1 | 240 | 1Ø | Compressor | Intermittent | Yes | Yes | ||||
| Lighting Circuits | 1 | 120 | 1Ø | N/A | Continuous | Yes | No | ||||
| Security System | 1 | 120 | 1Ø | N/A | Standby | Yes | No |
That Controlling Motor Candidate column matters. It forces the estimator to identify which loads can govern startup instead of pretending every surge happens at once. In residential and light commercial work, that single decision changes the recommendation more often than square footage ever will.
Name the table and use structured references. A formula like =MAX(Loads[Start kVA]) is easier to audit than =MAX(H6:H42) six months from now.
Calculation logic
The Calculations tab should stay disciplined. It has one job: turn the load table into a quoteable generator size without hiding the path.
Use simple functions and keep each step visible:
SUMIFS()for included running kW and kVAMAXIFS()orMAX()for the largest eligible motor starting valueXLOOKUP()for start multipliers, standard generator tiers, or rating tablesIF()for optional reserve logicCEILING()or a tier table for rounding to standard unit sizes
The sequence should read like a commissioning conversation:
- Sum included running kW
- Sum included running kVA
- Identify the largest single motor start kVA
- Calculate the start-event requirement using running kVA plus incremental motor starting demand, if that is how your sheet is set up
- Compare steady-state requirement against start-event requirement
- Apply reserve allowance if the quote calls for it
- Apply derating
- Round up to the next generator size you can order
That structure keeps the sheet honest. It also makes review easier when sales, engineering, and the installer all touch the same workbook.
How I'd build the decision cells
For a practical workbook, I would create named cells such as:
Running_kW_TotalRunning_kVA_TotalLargest_Motor_Start_kVAStart_Event_kVAReserve_Adjusted_kWReserve_Adjusted_kVADerated_Required_kWDerated_Required_kVARecommended_Genset_kWRecommended_Genset_kVA
The key decision cell should not be a single watts total with a mystery adder.
Use one path for steady load and one for the controlling motor event, then size to whichever governs. If the largest motor can start while the rest of the selected loads stay online, the startup check needs to reflect that condition. If the sequence uses load shedding, show that in separate cells instead of burying it in a margin percentage.
After that, map the result to standard equipment sizes. If the workbook returns an odd number and stops there, the estimating work is only half done.
If the summary says “16.8 kW required,” the customer still does not know what unit is being proposed. The sheet should return a real generator tier.
A useful residential example
A house with gas heat can still size very differently from another house with the same square footage. The difference is often the air conditioner compressor, well pump, or another motor load with a sharp start requirement.
That is why I do not build these files around square-foot shortcuts.
Two homes can carry similar lighting and appliance demand, yet one needs the next generator size because the controlling motor start is harsher and the site conditions cut available output. A workbook that captures the largest real surge and applies derating in the right order will catch that. A square-foot worksheet usually will not.
Make the output customer-readable
The Summary tab should be clean enough to print and specific enough to defend.
Include:
- project name and address
- generator rating basis
- selected required loads
- total running kW and kVA
- controlling motor or surge item
- reserve assumption
- derating assumption
- recommended generator tier
- excluded optional loads
- installer notes
Use conditional formatting for bad inputs and review flags. Highlight missing starting data on motor loads. Flag rows marked “included” with no run value. Flag any result where derated available capacity is too close to the requirement. Flag optional loads that were accidentally treated as required.
A good summary page protects the quote. It shows what was included, what was excluded, and why the final size landed where it did.
Validating Results and Accounting for Real World Conditions
A worksheet can look clean in the office and still fail on the pad.
I have seen that happen with jobs where the math was technically right, but the model assumed brochure output, stacked loads that would never start together, or ignored the one compressor that controls the generator choice. The result is usually a quote that looks competitive until the first hot-weather start test.
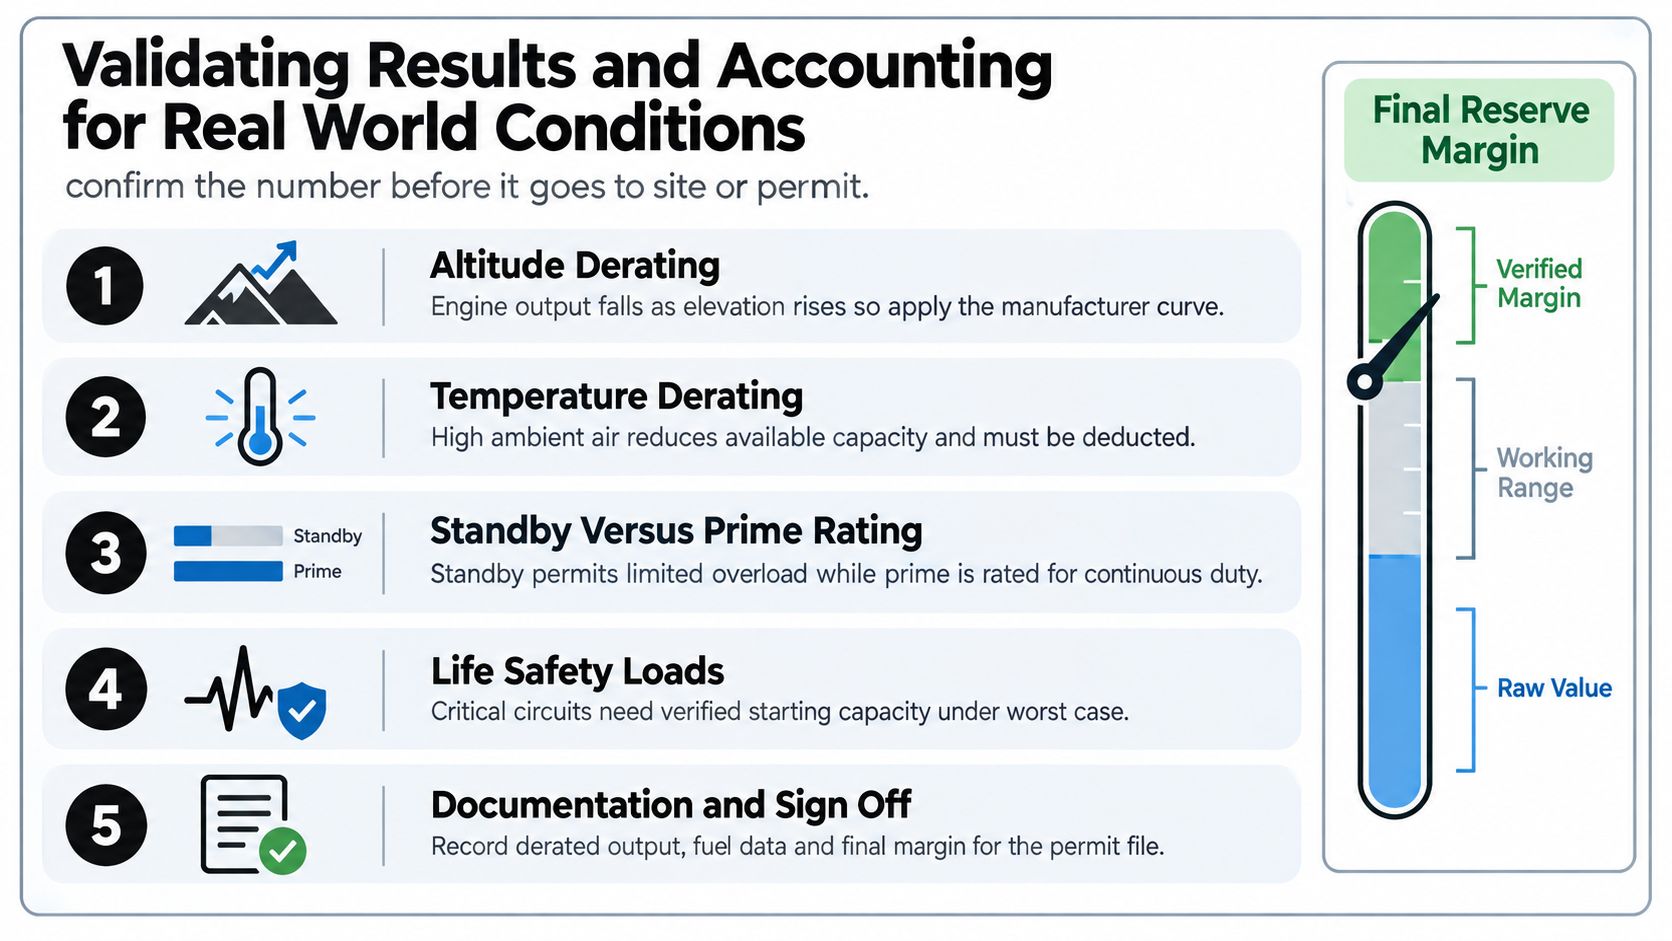
Derating can turn a safe pick into a tight one
Derating belongs in the validation pass, even if you already built it into the formula tab. Heat and elevation both cut real output. A size that looks comfortable on paper can become marginal once the unit is installed at a warm, high site.
The practical check is simple. Look at the derated generator capacity and compare it against two numbers separately: total running load and the largest starting event. If the sheet only confirms total watts, it can miss the core problem. In the field, the unit has to carry the running load and ride through the controlling motor surge without excessive voltage drop.
That is also where spreadsheet order matters. Apply site derating to available generator output first. Then compare that reduced capacity against your calculated demand. If the file applies reserve margin first and derating later, the recommendation can look safer than it really is.
Standby rating versus prime rating
The duty rating has to match the job. A residential outage unit, a farm unit that sees long seasonal runs, and a commercial unit supporting regular operations should not live under the same default dropdown with no warning attached.
Your Excel file should force an answer on rating basis, runtime expectation, and whether the quoted machine is being treated as emergency standby or something closer to a working power source. If you skip that step, the customer may approve a size that fits the load but not the use case.
I usually add a visible note on the summary tab for this, because rating confusion causes more callback arguments than formula errors.
Validate with a second pass
A good second pass does not mean adding random cushion. It means checking whether the model reflects how the installation will operate.
Use three cross-checks:
- Compare the spreadsheet to the actual circuit or equipment schedule
- Confirm the controlling motor start against manufacturer data, nameplate information, or a documented soft-start method
- Review whether the sequence of operation is real, especially for HVAC, pumps, compressors, and electric heat
If those checks disagree with the workbook, fix the assumptions before changing generator size. Very often the issue is load timing, transfer strategy, or a motor-start assumption that came from a rule of thumb instead of the equipment.
Permit assumptions belong in the file too. A practical guide to generator permits and code requirements is useful because the load calculation often gets reviewed alongside transfer equipment, fuel piping, clearances, and local code notes.
For installer comparison, one option is GeneratorInstallerList, which provides a ZIP-based directory of researched generator-focused companies and can help buyers find firms to review the load calculation, fuel path, and transfer-switch scope before ordering equipment.
Final Checks and Next Steps for Your Quote
A solid generator sizing calculator Excel file doesn't need to be fancy. It needs to be honest.
That means it does four things well. It models the single largest motor surge, it keeps running load separate from startup demand, it applies margin and derating in the right order, and it rounds up to a real generator tier instead of leaving you with a random watt figure.
Pre-quote checks that catch most problems
Before sending the worksheet to an installer or customer, run this quick review:
- Check motor rows. Every motor-driven load should have either starting watts or a documented starting method.
- Check overlap assumptions. Loads that never run together shouldn't be stacked just because they live in the same building.
- Check optional loads. Keep future or comfort loads visible, but separate from the base recommendation.
- Check power factor handling. If the job needs kVA review, don't stop at watts.
- Check derating inputs. Hot sites and high-altitude sites need a second look.
- Check output language. The summary should show assumptions clearly enough for quoting and permit support.
What to keep on file
Keep the spreadsheet, equipment notes, and the print summary together. If permit review, warranty questions, or a change order comes later, that file shows how the size was chosen.
If you're comparing install proposals, a cost guide for whole-house generator projects can help you separate the sizing decision from the rest of the quote. That keeps the conversation from drifting into apples-to-oranges comparisons.
The spreadsheet should get you close. A qualified installer should still verify the final load calculation on site before equipment is ordered.
If you've built the worksheet and want a second set of eyes on the result, GeneratorInstallerList helps you find generator-focused installers by ZIP code without turning the process into a lead form maze. It's useful when you need to compare who can validate load calculations, transfer-switch scope, and permit readiness before you commit to a unit size.
- generator sizing calculator excel
- generator sizing guide
- standby generator sizing
- generator load calculation
- excel calculator template
Ready to find who to call?
Open your state page or search by ZIP for a distance-sorted list.